Angular Components
This blog is written for the “Frontend Development" track of DevsInTech Blogs and part of the #2Articles1Week Challenge.
Table of contents
Welcome to the sixth article in the series - "A beginner's guide to understanding Angular". You can read the previous articles on this series from this link.
#1 Creating Components
We saw what components are from our third article. We saw that app is a component. Let's say we want to create another component similar to this. How do we do that?
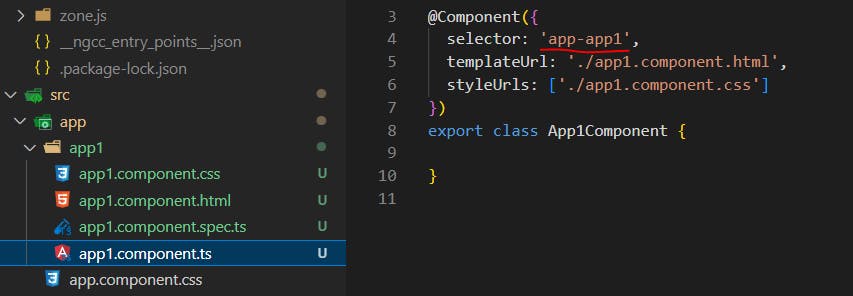
For that, we need to create a new folder, (let's say app1) and create the three files, app1.component.html, app1.component.css and app1.component.ts and create the content in files similar to app.component.html, app.component.css and app.component.css. And instead of the 'app-root' selector as seen in the fourth article, over here we need to use 'app-app1' or any name you wish with the "app-" prefix. We should also import this newly created component into our app.module.ts. Sounds confusing to do all this, right?
Fret not, as there is a simple command to create a new component without all these steps using CLI!
ng generate component app1
This command will go ahead and perform all the steps that I explained previously. As simple as that! We see that the new component is created with the selector as 'app-app1' as we saw above.

Now we have to link this with the app component that was existing by default. So go ahead and include the new component element <app-app1></app-app1> in app.component.html.

If you are getting any errors as <app-app1> is not a known element, make sure to type line 5 extra and on line 9, type
App1Componentinapp.module.tsfile
Save all the changes and open the browser window.

This proves that the newly created component also works properly!
#2 Components as selectors
Also, we saw that the components can be used as element selectors. But did you know that they can also be used as class selectors (.), property selectors, universal selectors (*) etc? Let me explain that.
For example, If we put selector: '.app-app1', then it becomes a class selector

That way, we can use 'app-app1' as a class, eg,

And that's a wrap-up. I hope you have learned something from this blog. If it's helpful to you and your front-end development journey then do like, follow me on Hashnode and Twitter and do subscribe to my Hashnode newsletter so that you don't miss any future posts. Thanks for reading and have a great day!
Stay tuned for the upcoming articles in this series!
