Data Binding - String Interpolation & Property Binding
This blog is written for the “Frontend Development" track of DevsInTech Blogs and part of the #2Articles1Week Challenge.

Welcome to the seventh article in the series - "A beginner's guide to understanding Angular". You can read the previous articles on this series from this link.
So the next concept in Angular is Data Binding. But, what is data binding? Data binding is the process that establishes a communication link between the app's UI (template) and the data that it displays (the TypeScript file/ the logic of the app).
There are two types of Data Binding, namely, String Interpolation and Property Binding.
#1 String Interpolation
String interpolation converts any variable to an interpolated format and it displays them on the screen. Interpolation basically binds the text with the expression value (as we will see below). By default, interpolation uses the double curly braces {{ and }} as delimiters.
Let's see a simple example of string interpolation.
Consider an Angular component that contains a name variable.
name = 'Rakshaa';
For displaying the name on the screen using String interpolation, we give
<h2> {{ name }} </h2>
Angular replaces name with the string value 'Rakshaa' and displays it on the screen.
Now, let's spice things up a little bit and see how to display your status (ONLINE or OFFLINE) using string interpolation!
For that, let us consider a flag variable that either stores true or false. Based on the value stored in the flag variable, we can display the status value as ONLINE or OFFLINE. Let,
flag = true value means that you are ONLINE
flag = false value means that you are OFFLINE
Go to app.component.html file and type,

Go to app.component.ts file and declare a flag variable and its corresponding value (true/ false) and a function( ) to display ONLINE or OFFLINE. The output is dependent on the flag value.
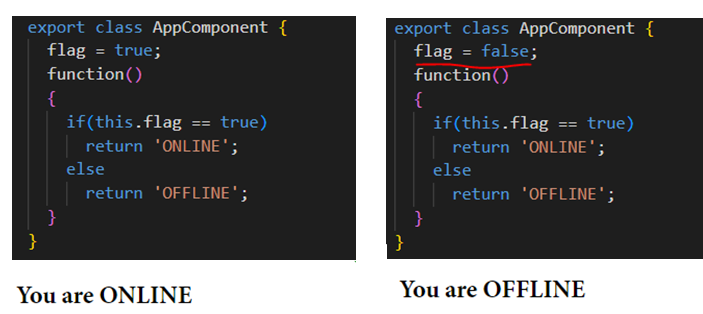
Note: Here, in the if statement, this.flag is used and simply flag is not used. This is because, since Angular is used for dynamic page applications, it must use the value pointed by the variable currently. This is ensured by the 'this' keyword.
#2 Property Binding
Every HTML element has some property or the other. So, let's say after a page is loaded, we want a button to be disabled for 5 seconds and then get enabled for the user to click in (this can be useful to avoid any discrepancies in button press).
This can be achieved with the help of a property named "disabled" in Angular.
First, create a button in app.component.html.
<button> Button </button>
The 5-second delay can be achieved by writing a constructor ( ) function in app.component.ts,

state = true;
constructor()
{
    setTimeout(() => {
      this.state = false;
    }, 5000);
}
The state variable is set to 'true' initially because the button is disabled initially. The disabled state is taken as the true state. The state variable is getting changed to false inside the setTimeout( ) function (setTimeout( ) function is an inbuilt function in Angular) because after 5 seconds (or) 5000 milli-seconds, the state = false.
enabled state = not (!) of disabled state = not of true = false
Now, we have to bind this property to the constructor( ) function written above. We do property binding by placing the property within square brackets [ and ] and then bind it to the outcome of any variable (or) function. The variable here is state as declared before.
Add the below line to app.component.html,
<button [disabled] = "state">Button</button>
This will generate an output where the button is disabled for 5 seconds after the page loads. And then the button gets enabled. This can be seen here,
![[animate output image]](https://im5.ezgif.com/tmp/ezgif-5-376e3bfe5c.gif)
And that's a wrap-up. I hope you have learned something from this blog. If it's helpful to you and your front-end development journey then do like, follow me on Hashnode and Twitter and do subscribe to my Hashnode newsletter so that you don't miss any future posts. Thanks for reading and have a great day!
Stay tuned for the upcoming articles in this series!


