Event Binding - One way & Two-way Binding
This blog is written for the “Frontend Development" track of DevsInTech Blogs and part of the #2Articles1Week Challenge.

Welcome to the eighth article in the series - "A beginner's guide to understanding Angular". You can read the previous articles on this series from this link.
For understanding Property Binding, we saw how to create a button and enable it, say 5 seconds after the page loads in the seventh article. Also, we changed our status to ONLINE or OFFLINE while understanding string interpolation.
Now, let's say we had a button to toggle the status from OFFLINE to ONLINE and vice versa. This will be easier instead of changing the flag variable (as we did in the seventh article) every time we want to do this. This can be performed using event binding.
#1 Click Event
Event binding is binding "DOM events" to a certain logic that will reside in your TypeScript file. So, we want to bind our function( ) that we had created in the seventh article to the toggle logic.
The DOM (Document Object Model) is a tree structure consisting of various elements of HTML [like head, title, body, h1 etc].
The DOM also includes events such as click event, mouse over event, load event etc. These events are what is referred to as "DOM events".
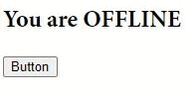
Every button has an event called 'click' and to the click event, we will pass the function ( ) which helps in performing the status change from ONLINE to OFFLINE and vice versa upon clicking the button. This can be done as shown below in app.component.html,

To perform the toggling operation, we will just add the one line highlighted in red to the function ( ) we wrote in the seventh article. These are added in app.component.ts as shown below,

In the browser window, the status toggles between ONLINE and OFFLINE when we click the button as follows,
#2 ngModel directive
We are now going to try to implement a directive called ngModel to better understand event binding. In this, we will implement two-way binding, i.e., combining property binding and event binding.
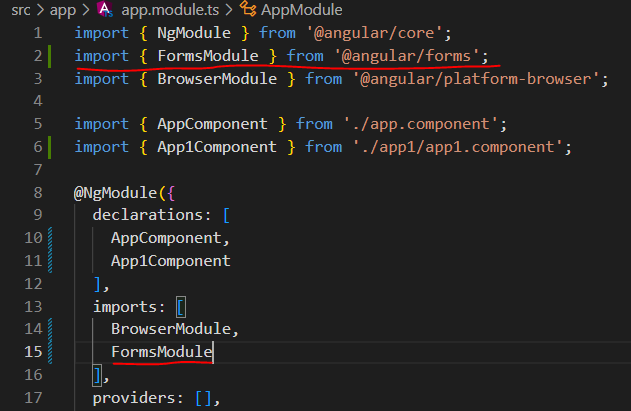
The ngModel directive binds the value of HTML controls (input, select, text area) to application data. For using ngModel in our Angular application, we need to import a new module named FormsModule. We saw here that, all the imports made to the app.component.ts file are done in the app.module.ts file.
So go to the app.module.ts file and type lines 2 and 15 to import FormsModule as shown below and save the file.
Next, let us first display our name using String Interpolation.
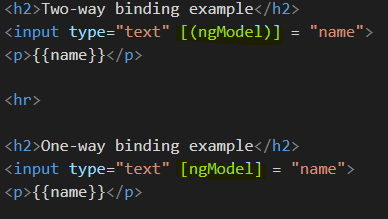
To check ngModel's functionality, the idea now is to write some content in the browser window screen and see if Angular updates it dynamically. For typing content in the output screen, let us now create an input box to enter text. We will include the ngModel directive in the input tag and bind it with the 'name' variable that we used to display our name earlier.

ngModel will bind whatever is typed in the input box to a certain variable ('name' here) that it is bound to. ngModel will be bounded as an event "()" and also as a property "[]" in two-way binding.
Note: Here ngModel is wrapped in [( and )] as shown above. We saw that we use [ and ] for property binding and an event is described by ( and ) as explained in the click event. Since ngModel uses a combination of these two delimiters, it falls under the two-way binding.
The browser window,

But we can change it as we wish in the text box and it automatically updates as shown below.

To understand two-way binding in further detail, let us try to understand what one-way binding is. ngModel will be bounded only as a property "[]" in one-way binding.
The browser window output screenshots for the above code illustrati two different cases,
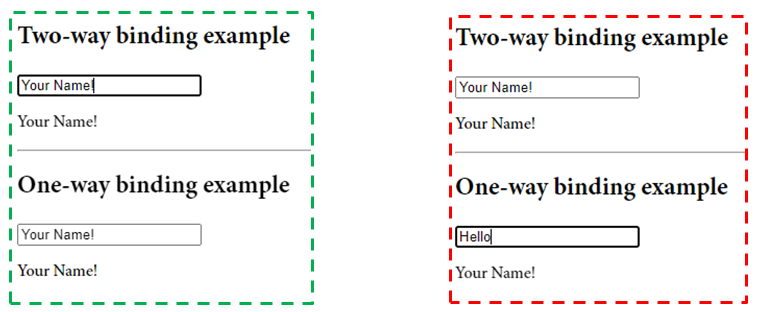
The one on the left is an example of two-way binding in which the text below is automatically updated once we change the text in the input box (since event and property are bound together) whereas the one on the right is an example of one-way binding where the text below does not change when we change the text in the text box (since event and property are not bound together).
Hope this helped you understand one-way and two-way binding better!
And that's a wrap-up. I hope you have learned something from this blog. If it's helpful to you and your front-end development journey then do like, follow me on Hashnode and Twitter and do subscribe to my Hashnode newsletter so that you don't miss any future posts. Thanks for reading and have a great day!
Stay tuned for the upcoming articles in this series!


