Directives in Angular
This blog is written for the “Frontend Development" track of DevsInTech Blogs and part of the #2Articles1Week Challenge.


Welcome to the last article in the series - "A beginner's guide to understanding Angular". You can read the previous articles on this series from this link.
Directives
A directive is a structure that gives instructions to the DOM. There are popularly two types of directives, namely,
(i) Attribute directives - These directives change the appearance or behavior of a DOM element. A few examples of attribute directives are ngClass, ngStyle, and ngModel. The directive name is enclosed within [ and ] to indicate an attribute directive.
(ii) Structural directives - These directives reshape the DOM structure by adding, removing or manipulating elements. A few examples of attribute directives are ngIf and ngFor. * is used before the directive name to indicate a structural directive.
Using built-in directives
ngIf and Else:
A ngIf directive works like a normal if-else block. That is, if a specified condition is true, a set of conditions get executed, otherwise, another set of conditions gets executed. For understanding this directive, let us consider the same example that we saw in the seventh article to understand String Interpolation. That is,
flag = true value means You are ONLINE
flag = false value means You are OFFLINE
Let us try to implement the same using ngIf and Else in a slightly different way.
In app.component.html file, let us use ngIf in a <p> tag and tie it to an expression. The expression here is the flag variable and we can say,
You are ONLINE (in if block)
You are OFFLINE (in else block)
For doing this, we are going to use a 'local reference'. A local reference is used within the ng-template. Let us give the local reference's name as #elseblock. In the else block, we put out another <p> tag which says, You are OFFLINE.
This local reference should also be referenced in the ngIf statement. We can do that by saying else; elseblock; as shown below.
Let a button toggle this flag. For toggling the flag, we are going to put out an event (click) and bind this event to the toggle( ) function as we have done here.
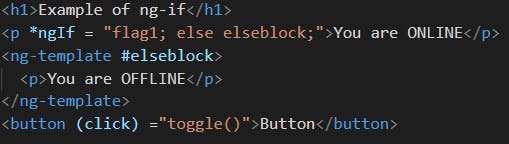
<h1>Example of ng-if</h1>
<p *ngIf = "flag1; else elseblock;">You are ONLINE</p>
<ng-template #elseblock>
  <p>You are OFFLINE</p>
</ng-template>
<button (click) ="toggle()">Button</button>
In app.component.ts file, we write the logic for the toggle( ) function just similar to how we wrote the function( ) here.
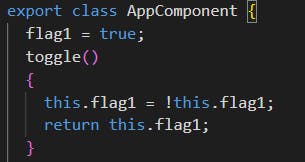
  flag1 = true;
  toggle()
  {
    this.flag1 = !this.flag1;
    return this.flag1;
  }
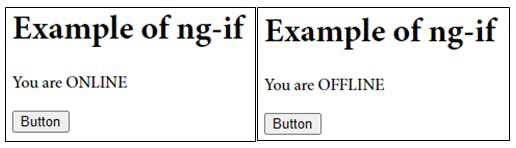
For this code, the outputs in the browser window before and after pressing the Button is shown below,
To make sure that we are displaying two different <p> tags when we press the button, we will give,
id = "true" for displaying You are ONLINE
id = "false" for displaying You are OFFLINE
Like,
<h1>Example of ng-if</h1>
<p id="true" *ngIf = "flag1; else elseblock;">You are ONLINE</p>
<ng-template #elseblock>
  <p id="false">You are OFFLINE</p>
</ng-template>
<button (click) ="toggle()">Button</button>
If we go and inspect the browser window now, we see that,
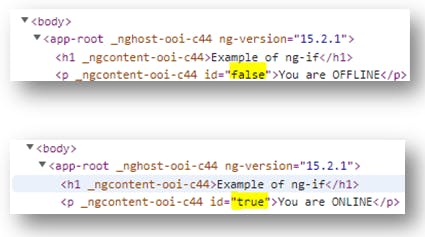
This indeed proves that these two are two different paragraphs!
(* is used before the ngIf which indicates that it is a structural directive)
ngStyle:
With ngStyle, we can give dynamic styling to different elements depending on a certain condition.
The syntax of ngStyle demands a 'property' and 'expression'. In the 'property', we can use properties like 'color', 'background-color' etc that we use as CSS properties. In the 'expression', we can use a function say getColor( ) which fetches the color from the TypeScript file and applies it to the element.
In the getColor( ) function, we can say like, if the flag = true, apply green color, otherwise apply red color. The getColor( ) method will return a string which will decide the color of the text.
In app.component.html file,
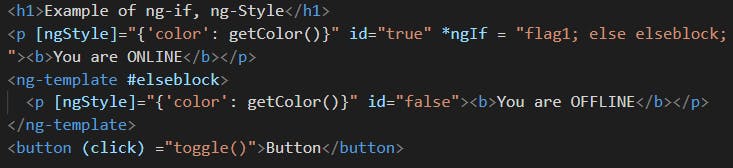
<h1>Example of ng-if, ng-Style</h1>
<p [ngStyle]="{'color': getColor()}" id="true" *ngIf = "flag1; else elseblock;"><b>You are ONLINE</b></p>
<ng-template #elseblock>
  <p [ngStyle]="{'color': getColor()}" id="false"><b>You are OFFLINE</b></p>
</ng-template>
<button (click) ="toggle()">Button</button>
In app.component.ts file,
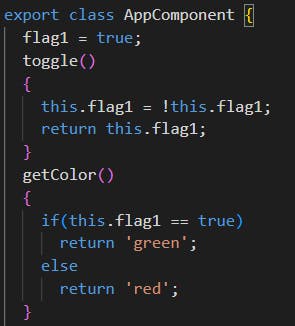
flag1 = true;
toggle()
{
    this.flag1 = !this.flag1;
    return this.flag1;
}
getColor()
{
    if(this.flag1 == true)
      return 'green';
    else
      return 'red';
}
The browser output will be,
*(*ngStyle is enclosed within [ and ] which indicates that it is an attribute directive)
ngClass:
Another way of doing dynamic styling is with the help of ngClass. By using ngClass, we can add an element to a class dynamically. For example,
Highlight text, when displaying You are ONLINE
No highlighting text, when displaying You are OFFLINE
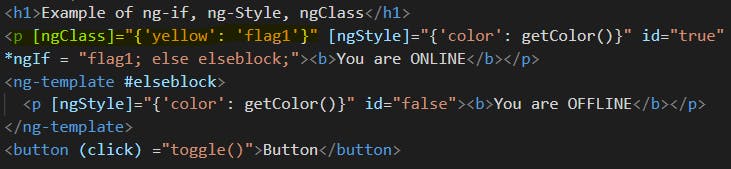
The syntax of ngClass demands a 'class name' and 'boolean value'. Let us call the 'class name' as 'yellow' and for the 'boolean value' part let us use flag variable used above {implying that the class becomes true when flag = true}.
In app.component.html file, (the newly added code is highlighted)
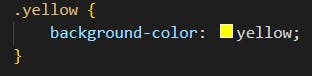
Now, since we have created a class called 'yellow', we have to define the class. Let us define the class in app.component.css,
There will be no change in app.component.ts
The browser output will be,
If we inspect the code in the browser, we observe that we add a class called 'yellow' and we remove the class called 'yellow' when we press the buttons. Thus ngClass is properly functioning.
*(*ngClass is enclosed within [ and ] which indicates that it is an attribute directive)
ngModel & ngFor:
ngFor is used when we want to iterate through an array.
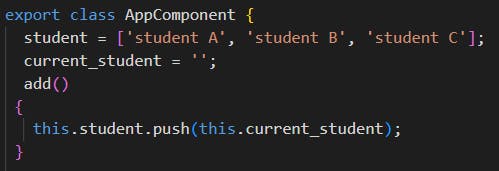
Let us first create an array in app.component.ts,
student = ['student A', 'student B', 'student C'];
Let us also have a function named add( ) that adds a new student to the student array every time a button is clicked. Let that new student be stored by a variable,
current_student = '';
In the add( ) function, let us add a line of code to push the current_student to student array.
add()
{
   this.student.push(current_student);
}
Finally, app.component.ts looks as,
In app.component.html, to make a place for us to type in new names, let us include a <input> tag and also create a place to display all the names. Also, we need to create a variable to push the values we enter in the input field. The variable that we can use here is the current_student variable we created earlier. The ngModel directive comes to our help here! With the ngModel directive, you can bind the value of an input field to a variable created in Angular. We can also create a button and bind the click event to the add( ) function.
<input type="text" [(ngModel)]= "current_student">
<button (click)= "add()">Submit</button>
To display all the names as one single item, we can create a list <li> using ngFor. The syntax of ngFor is,

In the syntax of ngFor, in the place of the 'item', we have to replace a variable name that runs through the array described by 'ítems'. So let us give the variable name (item) as, names and the array name (items) as student (we defined above). We should also interpolate the names in the <li> tag. The code for performing these changes is,
<li *ngFor= "let names of student">{{names}}</li>
Finally, app.component.html looks as,

Browser output initially,

Browser output after we add a new student named 'student D' looks as,

So, we have seen the working of ngFor and how it is helping in iterating through an array.
(* is used before the ngFor which indicates that it is a structural directive)
Summary
So we have pretty much come to the end of this series – “A beginner’s guide to understanding Angular”. Just to give a quick summary of what we understood in this series, we first saw what Angular is and how it is specifically used when developing single-page applications. Then I guided you on how to do the Project Setup by installing NodeJS and Angular and we also successfully displayed “Hello, World!” in our app. Next, we understood what modules and components are in Angular and looked at the four most important components in the app module – namely, app.component.html (for template), app.component.ts (for logic), app.component.css (for styling), app.module.ts (for imported files). We then pondered on what is TypeScript and why it is primarily used with Angular and what’s the relation between the two languages. We next looked at how Angular loads and what is the <app-root> element. We understood that the <app-root> acts like an entry component for the other Angular app’s feature modules. We next saw that for integrating CSS into our Angular app we need to make use of a CSS framework like Bootstrap. We learned how to install Bootstrap and checked its working by making use of a Bootstrap class named “jumbotron”.
We next saw what Angular Components are and saw how to create a new component. We saw how components work as various kinds of selectors and saw an example of components as class selectors. We then explored a new concept in Angular named Data Binding and understood its two types namely String Interpolation and Property Binding. We next saw what is meant by Event Binding and saw the example of ‘click’ event. We understood that two-way binding which is a combination of property binding and event binding with the help of ngModel directive. We learned how to import a new module named FormsModule for using ngModel in our Angular application. We also differentiated one-way binding from two-way binding by taking an example.
And, finally, in this article, we understood what directives are and discussed their two popular types namely, attribute directives and structural directives. We briefly discussed ngIf and ngFor as examples of structural directives and saw ngStyle, ngModel and ngClass as examples of attribute directives. We inspected the code written using the console to better understand what was happening to the code we had written.
One of the main advantages of using the Angular framework is that the framework is based on components. These components are small interface elements independent of each other and offer several benefits like,
Reusability: The component-based structure of Angular makes the components highly reusable across the application.
Simplified Unit-Testing: Being independent of each other, the components make unit testing much easier too.
Improved Readability: Consistency in coding makes reading the code much easier for developers which adds to their productivity and overall efficiency of the project.
Ease of Maintenance: Decoupled components are replaceable with better implementations in the future which enables efficient code maintenance and update.
Final Words
This series just covers the very basic concepts in Angular to help a beginner get started with the Angular framework with ease. It does not go to the deeper concepts like Pipes, Services, Dependency Injections, Routing and Navigation etc. These concepts and many others are equally important in building industry-level applications, depending on the requirements. The underlying thought process behind creating this series is not to make a person go from a beginner to an advanced level in Angular but to tweak the curiosity in everyone to explore deeper into the framework more.
Hope I explained all of these concepts in a way easy for you to understand. If you have any doubts, you are always welcome to ask your doubts in the comments here or on my Twitter. I will try to answer your queries to the best of my knowledge. Thank you, Happy coding!
And that's a wrap-up. I hope you have learned something from this blog series. If it's helpful to you and your front-end development journey then do like, follow me on Hashnode and Twitter and do subscribe to my Hashnode newsletter so that you don't miss any future posts. Thanks for reading and have a great day!